My Home Network Setup
Today I have decided to talk about my network setup I have at home. Being a student with not a lot of income, I have had to make compromises along the way but I think it has turned out rather well. This post might come in useful to other people trying to get into networking.
Network Diagram
Lets start with a diagram of my network. This should help you to visualise it:
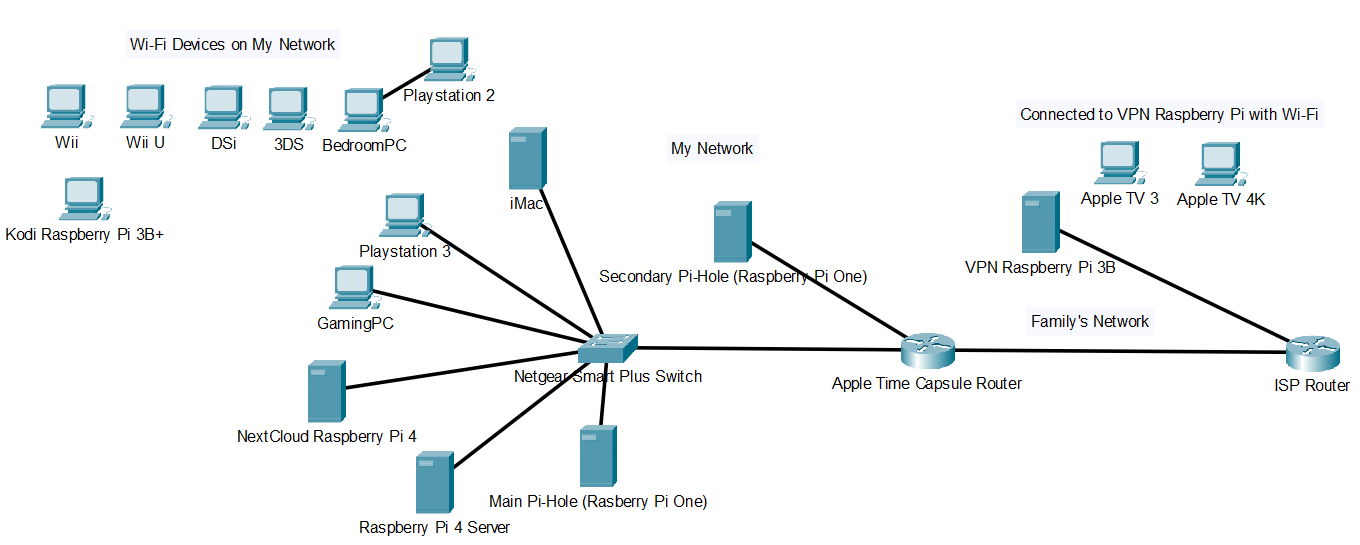
The first thing that should stand out to you is that there are two routers. That’s right I have separated my network from my family. This has both advantages and disadvantages.
Advantages
- Being able to modify your network to your liking without impacting anyone else.
- Security (Can’t trust family members who don’t really care about security).
Disadvantages
- Double NAT (This means you have to port forward twice and can cause issues with peer to peer services but that is rather rare in 2021).
- Accessing services on my network from my family’s network can be annoying depending on the setup.
Separating your network
Separating your network is extremely easy. All you need is another router (or PC that can act as one but these consume far more electricity with the advantage of usually having more features/customizability).
This needs to be connected into your main router and you need to ensure that NAT mode is enabled (not bridge). Network address translation (NAT) is what allows you to have a public IP which is used to connect to servers on the internet and a private IP for your home network. It translates between the two and is required as there isn’t enough IPv4 addresses for the whole world. It also acts as a sort of firewall preventing connections to devices on your home network as long as you haven’t ported forwarded.
This means that if someone were to hack into my family’s network then they would have access to my family’s devices but they would only have access to my port forward devices and would have to find an exploit in them or my router to gain access to my network.
The other very important step is ensuring that your main network and your new network are on two different subnets. If they aren’t then your computer has no way of knowing if 192.168.1.5 is a computer on the main network or on your new network you have setup and this can cause huge issues.
Personally I have used 192.168.3.0/24 for my network and 192.168.4.0/24 for my family’s network. The reason for using 192.168.3.0/24 is that it isn’t very common. This means that when I use my VPN I can still access my devices on my home network remotely as it is unlikely that the network I am connecting to will be using this subnet.
Apple Router?
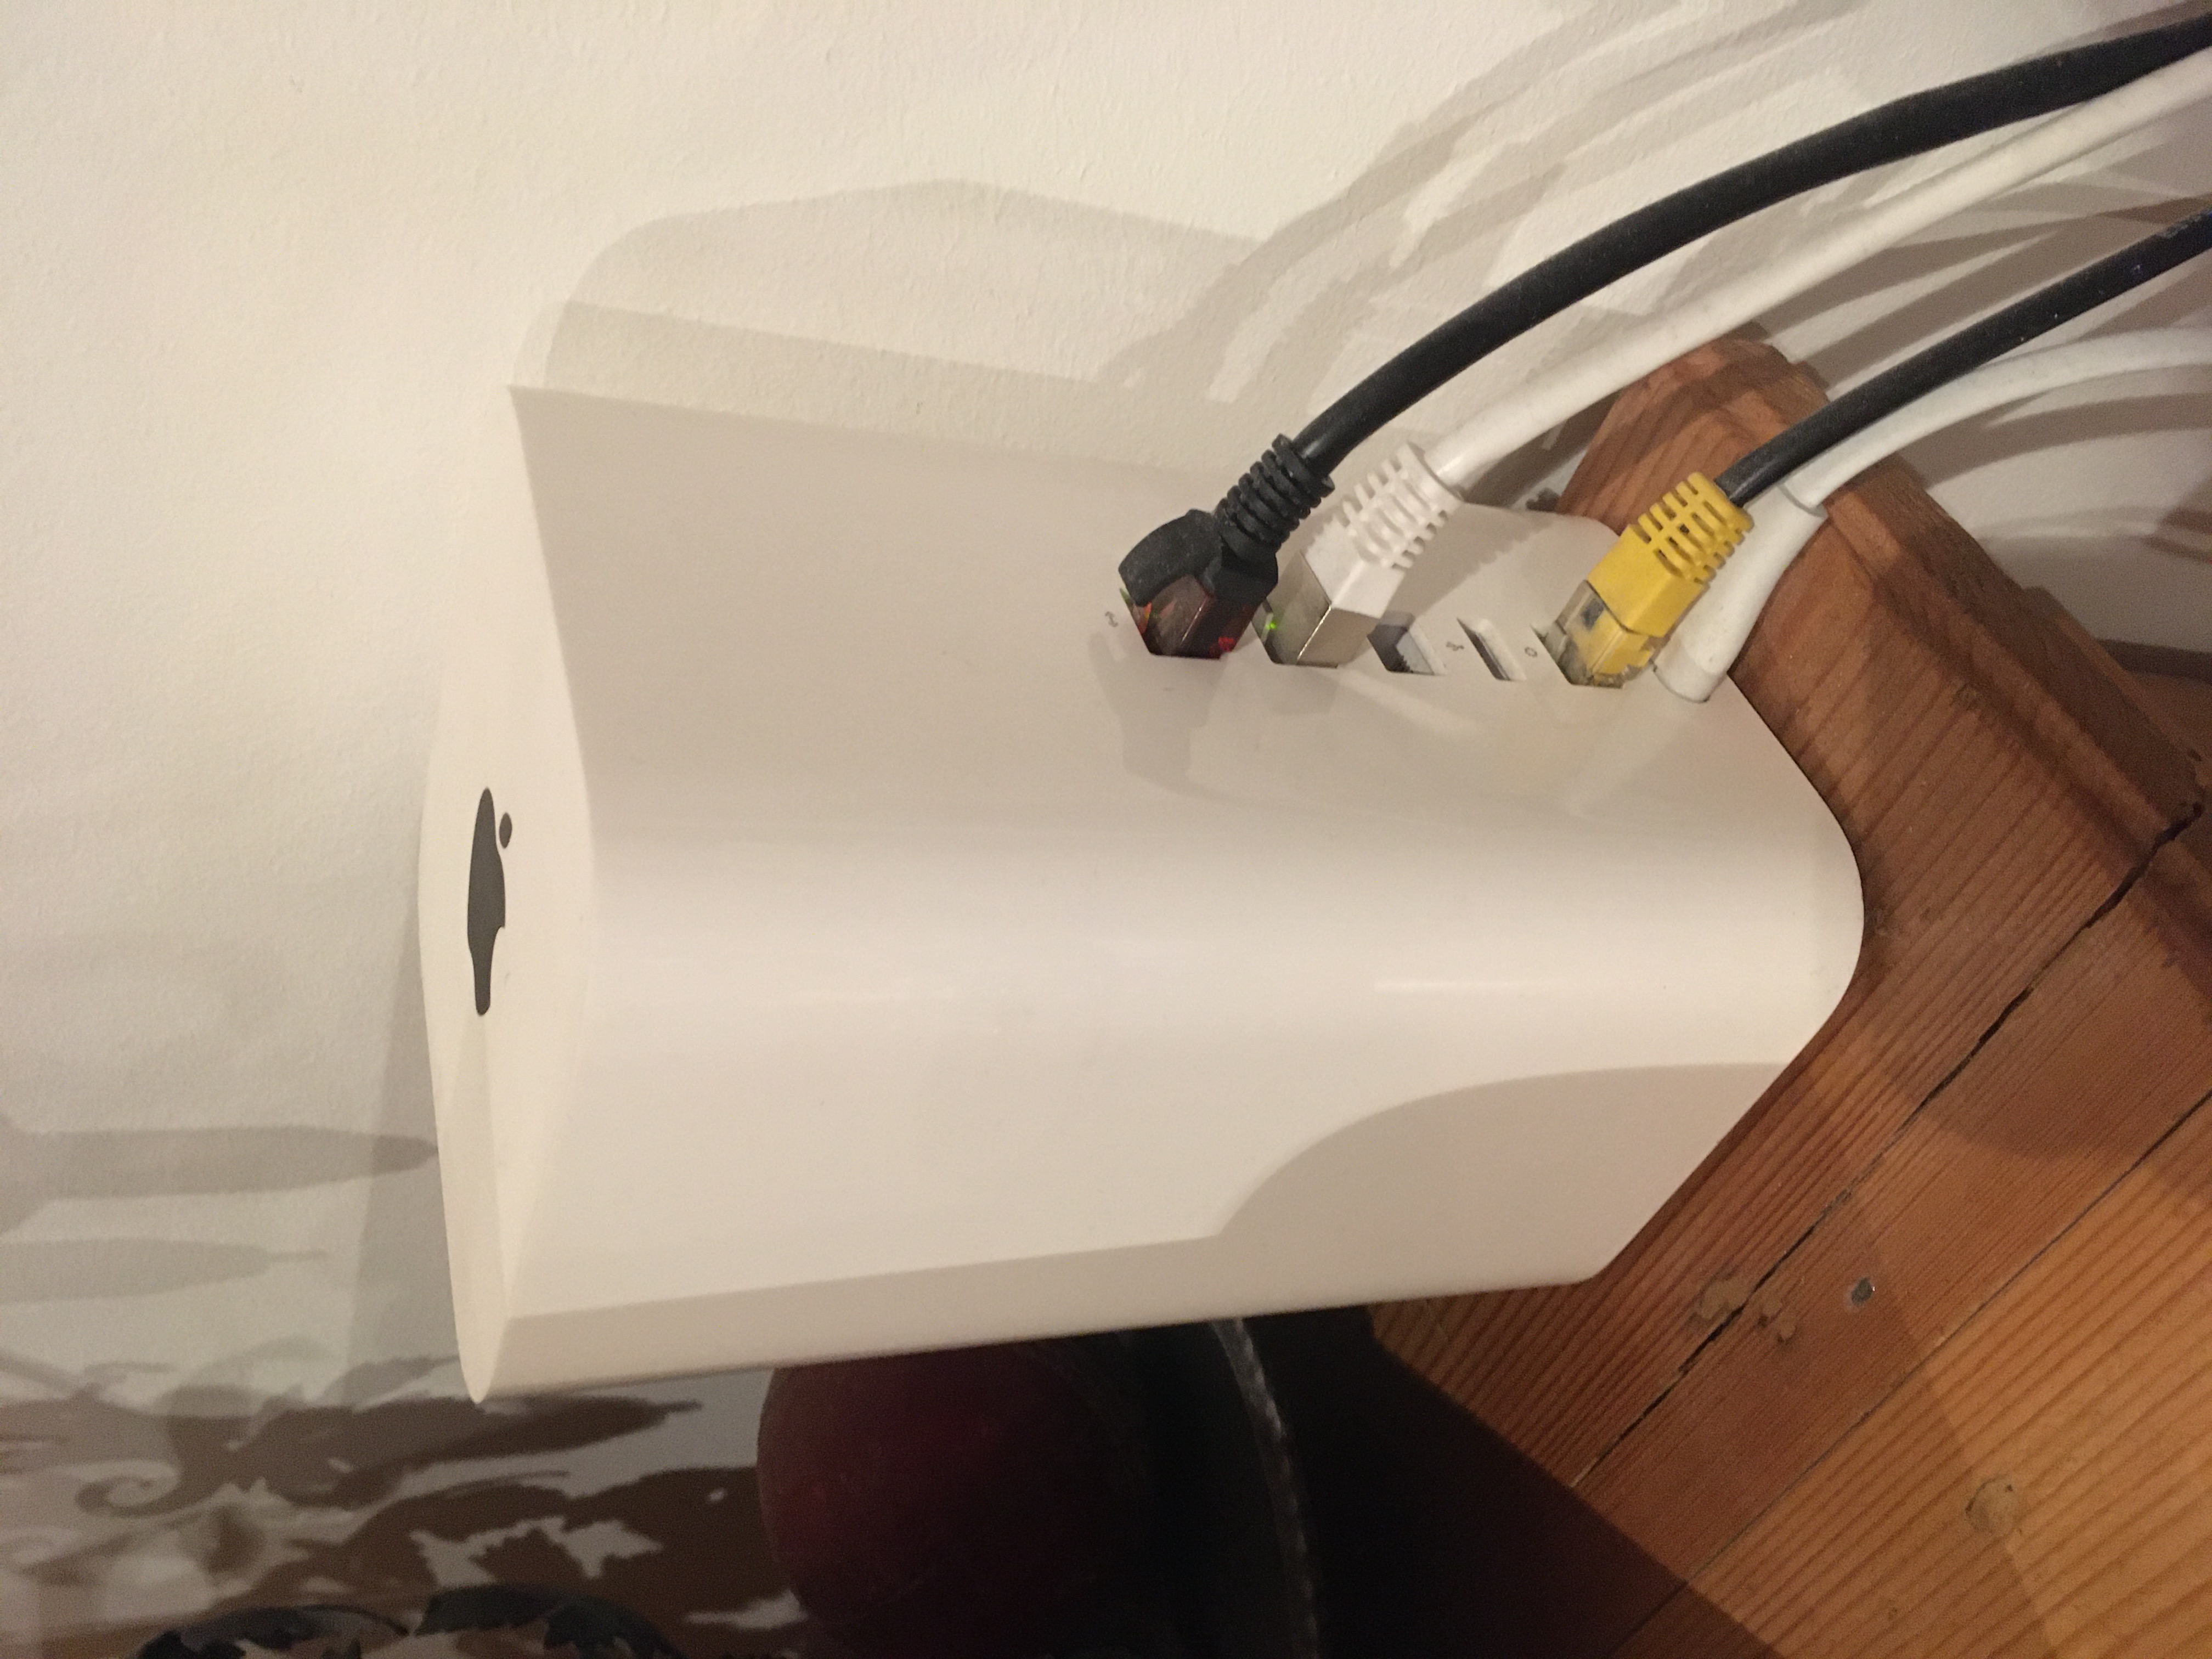
You might be confused about the Apple Router. Most people don’t know this but Apple used to have a brand of routers. A picture of mine is shown on the right (or above if on mobile devices). The reason we have one is because the Time Capsule model has a hard drive in it and thus is used to backup the iMac. If I had the choice I wouldn’t be using it but with my budget I have to make do with what I have! The one advantage over my ISP one is that I can change the DNS settings on it (more on that later). It isn’t awful but it has some baffling design choices. The main one is when changing any setting it requires a reboot. Why? I have no idea. It is the only router I have seen that does this. Even changing something as simple as port forwarding settings or adding a DHCP reservation requires a reboot. This very annoying as it causes you to lose access to the internet for up to one minute while it restarts.
DNS Setup
As mentioned in the advantages being able to modify my network without impacting the rest of my family was the main reason I decided to create my own network. I have setup Pi-Hole on my network. This converts a device, mainly Raspberry Pis (hence the name) into a DNS server that blocks trackers and advertisements online. To have this apply to every device you either need to manually change the DNS settings on your device which some restrict you from doing so or you need to set it as your network’s DNS server in DHCP (The protocol that assigns IP accesses to devices on your local network).
The DNS server I’m using is a program called unbound running on my Raspberry Pi. Instead of relying on a third party DNS server such as your ISP, Google, Cloudflare etc, my Raspberry Pi acts as the DNS server going directly to the root servers on the internet to get the IP address. The advantage to this is privacy. No server has all your DNS requests if you use unbound as you only contact Google’s DNS server if you visit a Google website. If you visit the BBC for example, unbound would contact the BBC DNS servers for the IP. By default your PC would contact your ISP’s DNS server (or whoever you have set) and then they would go and get the IP but this also means they know every single website you visit. The disadvantage to unbound, is that it is slightly slower the first time you go to a website as the IP isn’t cached. This usually only takes up to one second and in my opinion doesn’t outweigh the privacy benefits.
Pi-Hole works extremely well but has it does have false positives from time to time. This would have been a huge pain for me and my family and thus I moved over to a seperate network to prevent me the headache of having to deal with this.
I also have two of them running. The reason for this is redundancy. DNS is a critical part of your network and so if the Raspberry Pi running Pi-Hole fails for whatever reason none of your devices on your network can resolve hostnames and thus can’t access the internet.
As Murphy’s law says, ‘Anything that can go wrong will go wrong’ and thus having a backup is very important. Once I was on holiday for 3 weeks in another country. On the final week my Raspberry Pi running Pi-Hole, crashed. The reason for this I didn’t find out but I was unable to access it though SSH and thus it required a physical reboot. Being abroad this was obviously not possible and thus this left many devices on my network unable to resolve IPs. Since then I have always ran a second Pi-Hole so this never happens again!
Server Setup
For my servers I am using mainly Raspbery Pis. My main server is running a Raspberry Pi 4 4GB model. It is the one currently running the webserver you are using to read this! The great thing about Raspberry Pis is that they are rather cheap to buy and very very cheap to run but unfortunately has become a limitation in my setup. It isn’t powerful enough for some services I want to run and adding hard drives is a pain as it only supports one USB at a time (due to it not being able to supply enough power to multiple drives) and thus you need an USB powered hub if you want more than one. Additionally being an ARM CPU means that some programs won’t run on it. Finally the SD storage is awfully slow. Yes I know I can boot off a USB SSD attached to the USB port but that also requires a USB hub as it won’t power a hard drive and an SSD at the same time (I could be wrong on this though as I haven’t tried it and don’t feel like potentially wasting money to find out!)
I was planning to upgrade my GamingPC and use my old PC as a server but unfortunately the mining craze of 2020/2021 happened and PC parts are unattainable or ridiculously priced. But it’s definitely my next upgrade.
Below is an image of my homer dashboard with some of the services I’m running (not all on the Pi).
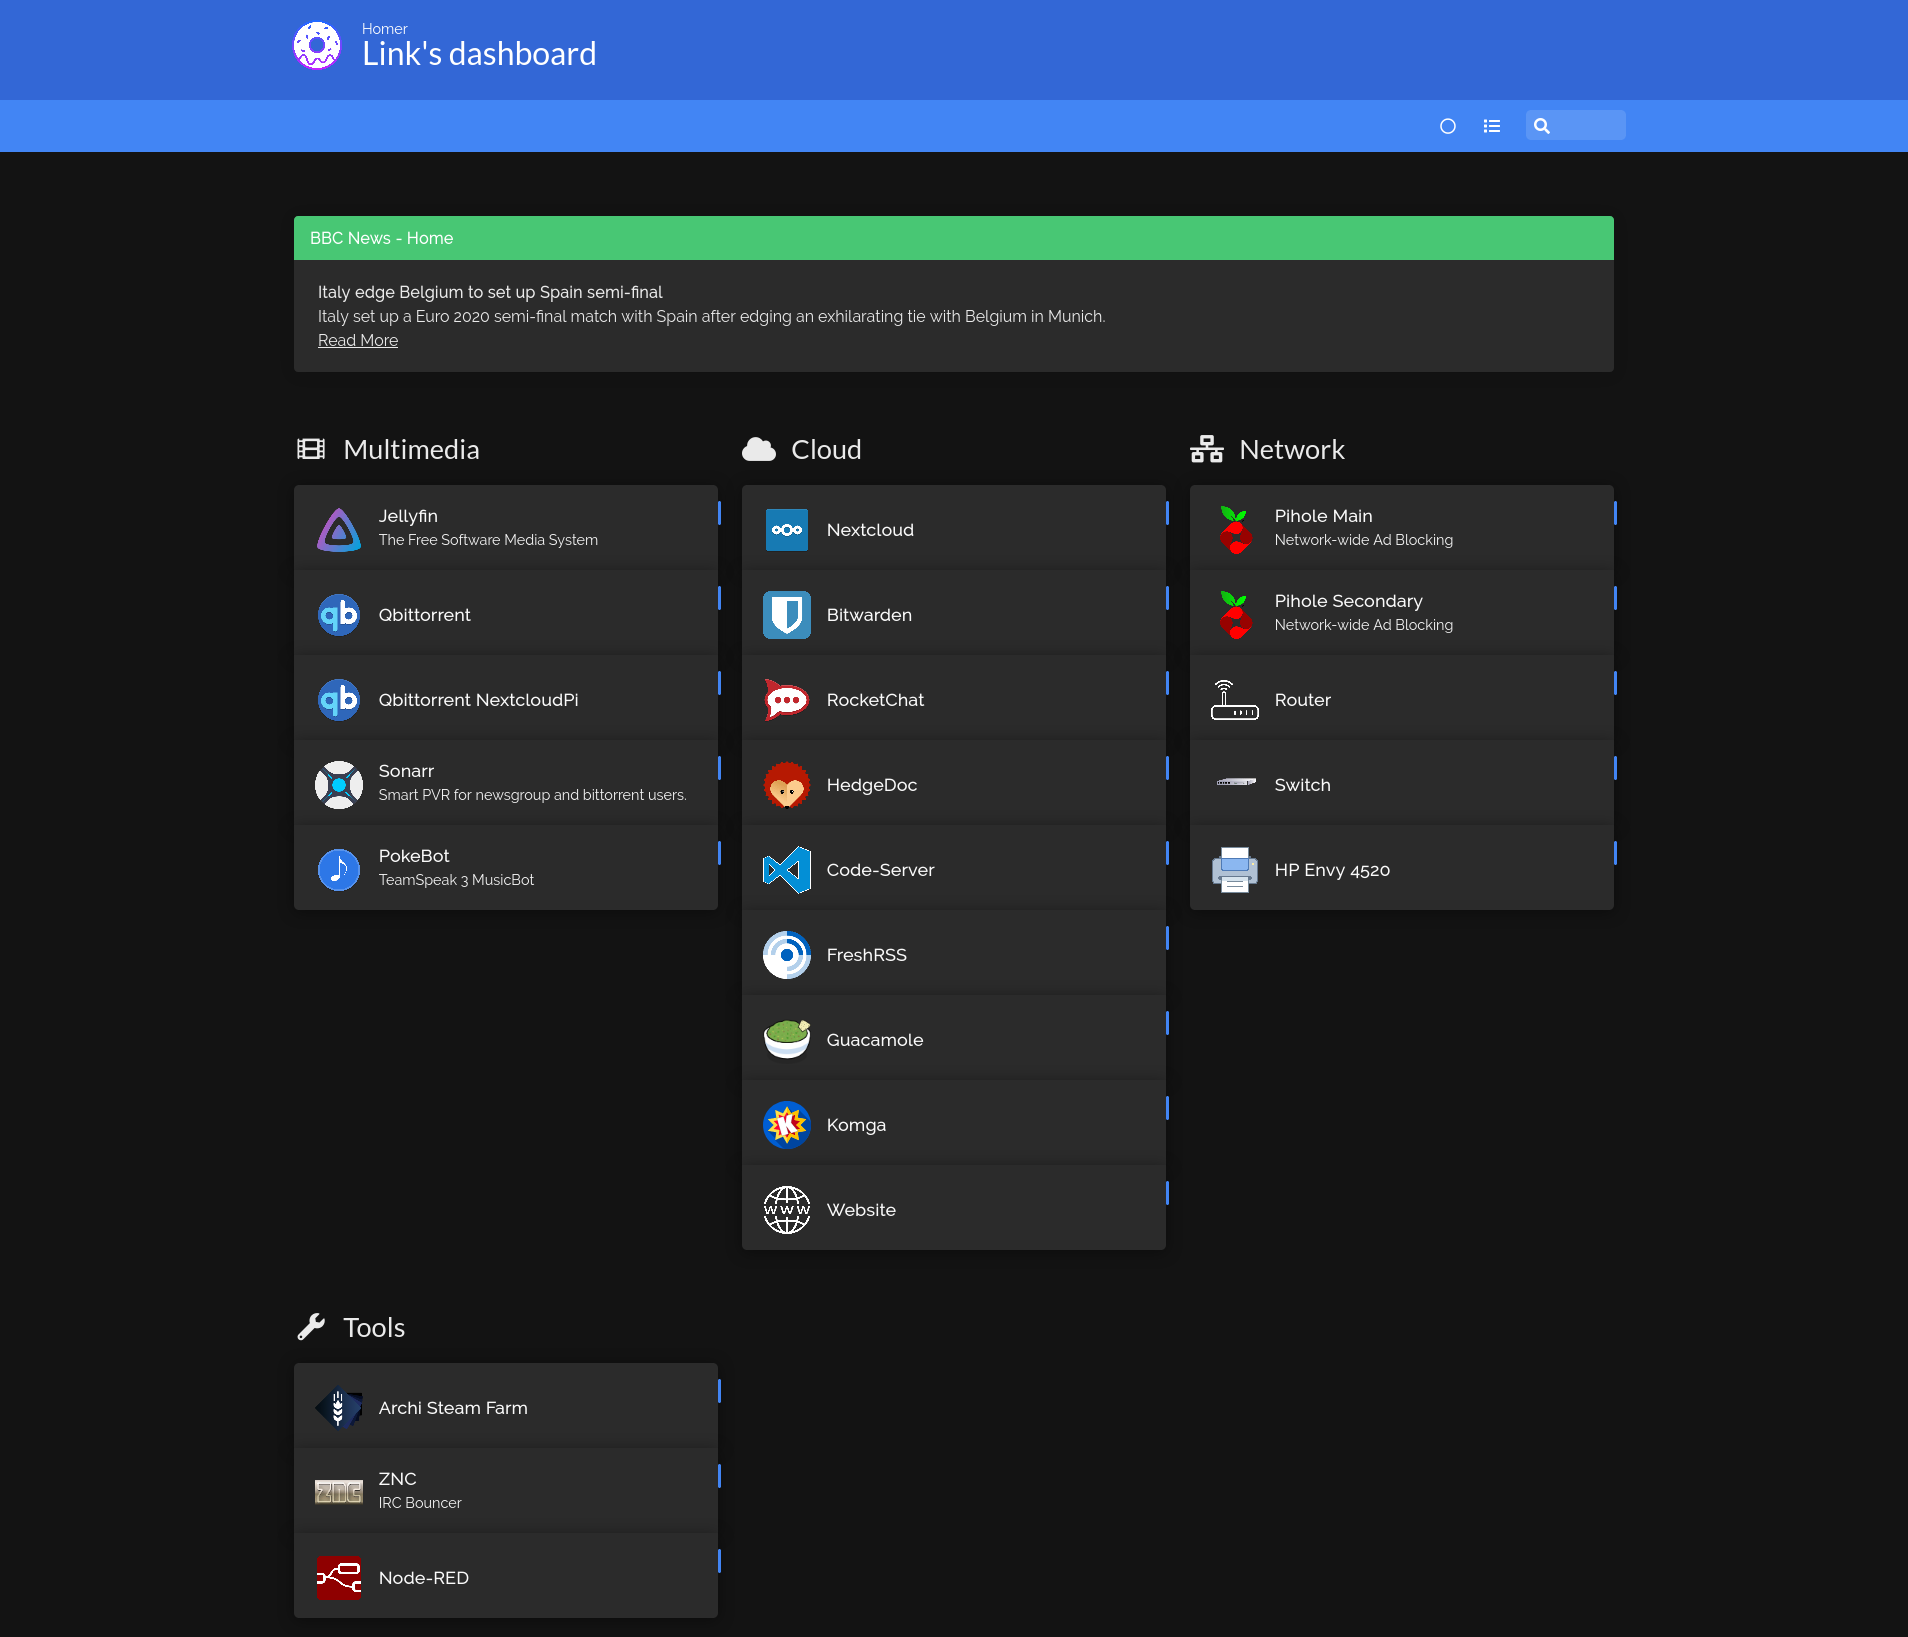
Nextcloud is running on it’s own Pi as it is it quite demanding. You might have noticed the iMac had a server icon in my network diagram. Well that is because it has been converted into a server as my family don’t use it. It is running my Jellyfin server as a Raspberry Pi is far too weak to transcode content in real time. However, the files are stored on my Raspberry Pis and connected to the iMac via a NFS share. This allows me to use the hard drives on my Server Pi and Nextcloud Pi for other things as well as Nextcloud.
Additionally it is running other services such as Guacamole, Minecraft servers from time to time, a TeamSpeak Server and Rocketchat, pretty much anything and won’t run on a Raspberry Pi.
Finally, you might have noticed the VPN Raspberry Pi on my family’s network. This is actually acting as a router and Wi-Fi network too. The reason it is on my family’s network and not mine is to free up switch ports and to avoid a triple NAT. My parents wanted access to foreign Netflix but didn’t want to pay for a VPN. To solve this issue, I bought a new Raspberry Pi 3B+ for myself (Raspberry Pi 4 wasn’t out at the time) and put the old Raspberry Pi 3B on my Grandparents’ network (they live abroad) and created a VPN with WireGuard. Then I used a spare Raspberry Pi 3B and turned it into a Wi-Fi router and connected it to the VPN running on my Grandparents’ Raspberry Pi and I can access foreign Netflix on an Apple TV!
The one limitation of this is that the Wi-Fi card on the Raspberry Pi is pretty awful and thus speeds cap at around 15Mbps which is more than enough for 1080p content but 4K might struggle.
PS2 connected to PC?
I know some of you are wondering why the PS2 is connected to the BedroomPC. This is because I’m running an SMB share on my BedroomPC and have ripped my games to it. This allows me to have improved loading times and not have to worry about the discs being damaged or the laser dying. It also allows my PS2 to access the internet by going though the BedroomPC connected on Wi-Fi.
Why bother selfhosting so many services?
I know some of you might be thinking this. “You could just use Dropbox, Google Drive, Lastpass, 1Password, Evernote etc”. The simple answer comes down to 3 reasons: privacy, ownership of data and fun!
Privacy is one of my major concerns and it ties into ownership of data. I like to know where my data is stored and what it is being used for. If a service is free you can be sure that you are the product (unless it is Linux or Open Source and you have verified that they aren’t mining your data). By selfhosting services I know that all my data is on my computers and that I have full access to it. If I want to delete something I can do it with a simple command. I wish you luck deleting your data from some websites and even if you can how do you know they have really deleted your data? You can’t. Personally, I don’t want companies such as Google or Facebook knowing everything about me and then selling that on to any advertiser or company that wants to pay them for it to use for nefarious purposes.
Also, I just find it fun to tinker with my network and servers, improving them, adding new services all while increasing my knowledge at the same time. Most of my networking knowledge has been self-taught.
Upgrades
These are the upgrades in order of importance I would like to do to my network:
- Upgrade Server.
- Create a backup server.
- Upgrade Router and Switch.
Conclusion
Hopefully reading this was interesting and has given you more knowledge on networking if you didn’t know much before! Creating my network has been a huge amount of fun and there is still a huge amount of improvements I can and hope to make to it in the near future!
If my network changes significantly I will create a new blog article talking about it!